Monday, October 3, 2016

Get Free Hosting and Free Domain

Hi, before I start the tutorial how to get free hosting and domain, please let me introduce my self.
 me, as newbie or newcomer in here which wish to become an expert. so, if there any non-correct things or you want to give an advice go ahead, we learn together and success together.  By the way this blog is not only for your tutor but this blog also help remembering me to know the step by step or "my diary" for make some bucks in internet. so, I will make it as easy as possible to be understand for another newcomer like me. is that possible to make some extra money in internet? yabsolutly yess!!

okey, here we go my first tutorial!!

Sign up New Free Domain

 First, build your own free domain anywhere which served that. But in this in here I will used freenom to create my free domain, please kindly click this link freenom
 When you click it, will appear the front page of freenom
homepage freenom
check your domain
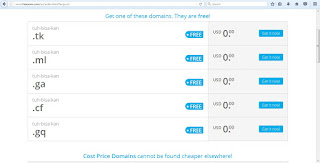
 try to check availability of your domain, I check it with "tuh-bisa-kan" and they show me this
free domain
chose one or chose all is no problem
 if you have your choice then click continue/checkout. then you'll directly to next page
freenom cara domain gratis
 choose the expired time of your domain, done! then just continue. and you will go to checkout page
checkout freenom

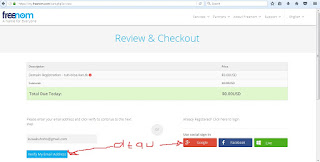
 choose your verify method, then fill the form of your information like name, password, zip code,etc. check your inbox, and verify it. if it already verified, then will appear this page, and voilaa... your domain ready to rock!
 it's done for make free domain, now let's get the free hosting. go go go go!

Sign up new Free Hosting

 Please kindly click this link hostinger. After you click the hostinger then will appear Home page of hostinger. all you have to do just click in Mulai Sekarang or if you use english language will appear Start Now which one I marked with red circle (even they not like circle at all)
home page hostinger
Klik di "mulai sekarang"
 Then you will be directly to checkout page, choose your time limit for your hosting then click checkout.
checkout id hostinger
click lanjut checkout
 Next page is you will ask to login or sign up, I prefer to sign up for new account than login with g+
lanjut daftar hosting gratis
daftar baru atau login?
Complete the register form and click next, when you're done registering you will go to this page and click submit.
yuk submit aja langsung
when you done submit, please check your email, there will be message from hostinger that order to verify your hostinger, after verify just copmplete your setup
Here the setup page, just complete the from and click setup
setup id hostinger
when your done, this what will looks like.
hosting gratis jadi
 congrats, your domain has been approval and you already have new domain with no cost. now let's to the next step! this section we will talk about build your own Web. but I will split it with 3 section. there are

2. How to sync Domain to blogspot (not necessary to read no.1)

 well, thats all about tutorial how to get free hosting and domain, please be advise if there any mistake that I made in this article, remember I'm just a newcomer here, so let's learn together and when you have an advice just spread it in here. see you till the next "how to"

Connect Domain to Hosting

hi, it's my pleasure to meet you again.
 continue from my previously post tutorial/how to get free hosting and domain. well, from now on is about how to connect domain to hosting. In here, I use hosting in idhostinger with freenom's domain. so, when you use another provider will be a little bit different but still compatibility with your provider.

okay, just let's to the step by step.

 please open your freenom and hostinger in another tab surely,  then login with your account which we made previosly.

 First we start from freenom, click on "service" menu and click sub-menu "my domain" if it does, you will directly to page like this image and just click in "manage domain"(with gear icon)
klik manage domain
Then go to "management tools" menu and click again in sub-menu "nameservers"
masuk ke name server
then, just go to hostinger and keep the freenom like that.

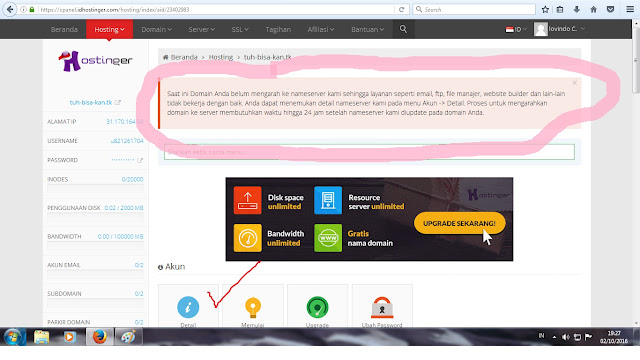
 in hostinger there will be notification like in this image(which marked with pink tint) and this notification is not an error, this happen cause the domain is not sync yet. now click on detail(that marked with red checklist).
notif domain belum sampe
 if it's already clicked will appear informatin in Detail Nameserver.
detail hostinger
  then copy all of that(marked red checklist) and paste it to freenom.
 don't forget, click the custom name server, if you let it default, it will revert to server freenom again. got it?
input nameserver freenom
last just click in Change Nameservers and voillaaaa it's done, your domain is already connect to your hosting

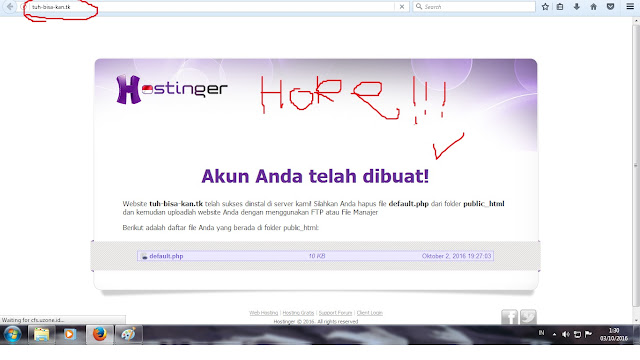
 Now check it, is already sync or not? just type your domain name to addresbar just like this image.
jadi webnya
alright if it's already done, let's refreshing for a minute and let's laugh together before we go to the next step. let's laugh or sing like no one listening. LOL :p

alright, let's go to next step how to make CMS wordpress / content management system of wordpress 

Sync Domain to Blogspot

hello, just like count 1,2,3 to  build your own free domain, isn't it? no w is time to sync your Blogspot to your domain. ready?

 Before I continue the tutorial, I would like to share a little compare between CMS wordpress and CMS blogspot.

I think, it's just my opinion okay,
1. CMS Wordpress has many plugin that can build structure of the SEO with easily, so this thing will make our web can more possible to present on page one in Google.com, but don't underestimate the Blogspot, the Blogspot is one of google's apps(just like father and his son, his father will priority his son than other people)
2. For edit the inside of the web(HTML) CMS Blogspot it's easier or I can say the interface is more humanity or something like that(sorry if you can't understand my word remeber I'm just a newbie here lol). when you use wordpress, there's to much of sub-HTML, so if you get any problem with them it's pretty dificult.
3. About Themes, CMS Wordpress is more eye-catching but, with dynamic view, and has many themes to choose beside CMS Blogspot, but that's not mean the blogspot themes not good.
4. When use CMS Wordpress you must have hosting and must be selective to choose what kind of plugin to protect your web cause many plugin look same, but it's doesn't same after all(tips, you can check by rating of  the plugin). otherwise CMS blogspot give you an unlimited free hosting that has highly secure protection for your web

 actually this compare is already posted in my previously blog CMS Wordpress it's just a little "warming up" before I shared "how to?".

By the way why I posted this tutorial? the point is to make all of you to get shorten link then before. so we don't have to use .blogspot.com after our link

 I think all of the post above is has already posted in my CMS Wordpress post, it's just another chit chat :p
 why I write too much chit chat? because this tutorial is pretty short, and realy simple, but still need to do with carefully and need focus, (oh no, another chit chat. lol)

 No more chit chat, just go to the step by step. 


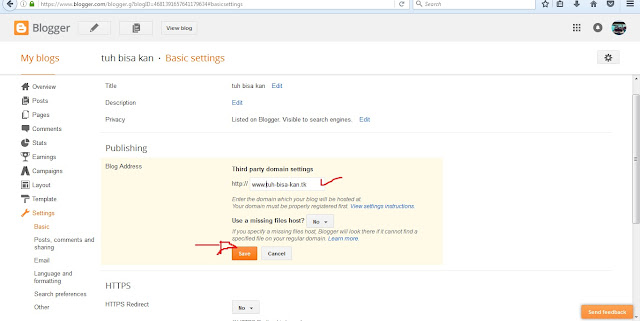
 first step is log in to your Blogger account and go to setting and click on basic then clik on + Setup a 3rd party URL for your blog, and then will appear frame to submit your URL or domain which one has already created with us in previous post, then click save. here's the screenshot
setting basic blogspot
 What? error?

 No no no keep calm don't panic this is normal, maybe this not your fate to move on from blogspot.com. :p just kidding  .

 Here is the explaination before we go to the next step. so, why blogspot report an error? when blogger is a man maybe they will say "what's wrong with this guy, he submit the domain but I can't found the source? hmm, how about report an error to shocked him. hohoho(with evil laugh)" so there is the reason why it's become an error . To solved this, let'us continue the tutorial.

 let's go to freenom(or any site where you build your own domain, in this tutor I used freenom to be my domain).
copy name, label, etc that I marked with red circle even they dont like circle ("INGAT INI")
kode blogspot
 Then login to your freenom account and go to menu services->my domain then click manage domain(with gear icon) then click manage freenom DNS
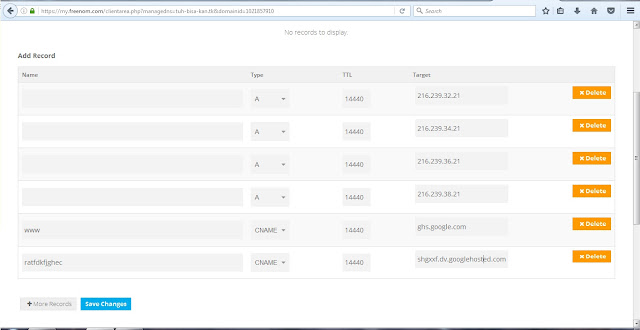
then input code like this picture below
masuk ke freenome dan input label A dan CNAME
copy this to label type "A" and leave the name "Blank"
216.239.32.21
216.239.34.21
216.239.36.21
216.239.38.21
 paste "ghs.google.com" and all of that code which I tell you to copy before this step (which I wrote or marked with this word "INGAT INI") paste them in label CNAME.
 when it's done, save it then suddenly will appear report with green color say this
  • Record added successfully
  • Record added successfully
  • Record added successfully
  • Record added successfully
  • Record added successfully
  • Record added successfully
 okay, next step is to try submit your domain again to Blogspot and let see what happen

tuh bisa kan
Tuh Bisa kan
 voila you did it great!

 If can't try to refresh your browser and re-submit your domain.
Check it with insert your domain to addressbar. sometime it takes 24 hour for blogspot to fully complete sync with your domain so, be patient.

Here's mine let's see it tuh-bisa-kan.tk This step is most important Lol :D

 ups, dont forget this too
 this function for those who visit your web without "www" still can access your web.
have a great day and good luck to try.

 alright, I think that's all step by step for how to sync your Blogspot to your domain , if still any question just write in comment bellow and let me know. if you have an advice spread it in here I would appreciate it. and for the last, please be advise for my abstract word or paragraph, because I'm just newbie here. thanks for coming and have a great day.

 a little secret from me, if your web already done, I'll tell you a secret how to increase your traffic from anywhere you want. so keep stay with me


Build web with CMS Wordpress

hello, you already have free hosting and domain, haven't you? and must already sync your domain to your hosting, isn't it? if it already done let's sart build your CMS wordpress / conten management system of wordpress

before we continue, I would like to compare between CMS wordpress and CMS blogspot.

I think, it's just my opinion okay,
1. CMS Wordpress has many plugin that can build structure of the SEO with easily, so this thing will make our web can more possible to present on page one in Google.com, but don't underestimate the Blogspot, the Blogspot is one of google's apps(just like father and his son, his father will priority his son than other people)
2. For edit the inside of the web(HTML) CMS Blogspot it's easier or I can say the interface is more humanity or something like that(sorry if you can't understand my word remeber I'm just a newbie here lol). when you use wordpress, there's to much of sub-HTML, so if you get any problem with them it's pretty dificult.
3. About Themes, CMS Wordpress is more eye-catching but, with dynamic view, and has many themes to choose beside CMS Blogspot, but that's not mean the blogspot themes not good.
4. When use CMS Wordpress you must have hosting and must be selective to choose what kind of plugin to protect your web cause many plugin look same, but it's doesn't same after all(tips, you can check by rating of  the plugin). otherwise CMS blogspot give you an unlimited free hosting that has highly secure protection for your web

 one more thing, why I make this tutorial is cause of for those who want to install an external plugin or external theme, as we know we must paid an hosting to get this facility. even when we already have own domain we must paid for security of wordpress. and one more reason why I make this tutorial is to get our link shorten than before.

 oh ups, too much warm up. alright then just let's to step by step.

 First, download this wordpress.org

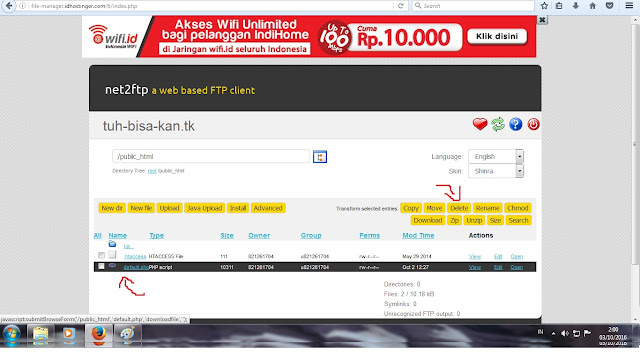
 Meanwhile the download is in progress, login to your hostinger and go to file manager and click public_html. (if they ask about FTP account, just make the FTP account first)
file manager hosting gratis
when you already get in delete file default.php, then upload the wordpress.zip that you download previously here's some screenshot how to delete and upload the file
bikin Wordpress gratis
geratis bikin WP
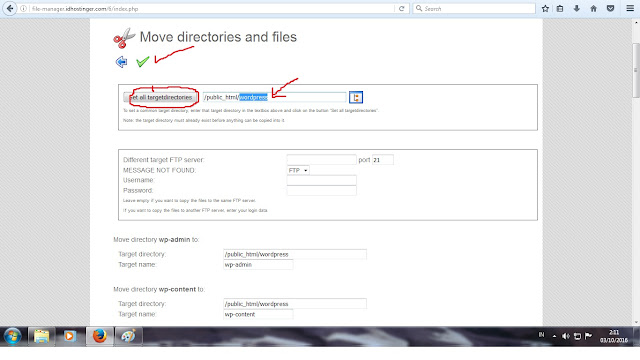
 if the upload is done, just go to folder /public_html/wordpres check all file and move it permanently
and follow this instruction.
1. replace /public_html/wordpress with /public_html/
2. click set all target directories
3. then click the green checklist icon
pindahin semua file
the next step is search for file wp-config-sample.php and click edit
wp-config-sample.php
Search this code on wp-config-sample.php
// ** MySQL settings - You can get this info from your web host ** //
/** The name of the database for WordPress */
define('DB_NAME', 'replace with your Database name');

/** MySQL database username */
define('DB_USER', 'replace with your Database User');

/** MySQL database password */
define('DB_PASSWORD', 'your Database Password');

/** MySQL hostname */
define('DB_HOST', 'your database hosting');
 where you can get your database info? go to menu My SQL complete the form, then copy the database info to file wp-config-sample.php

database my SQL
sorry for the abstract marked
tutorial wordpress
 when you done editing wp-config-sample.php, don't forget to save it.

 all preparation is done, now is time to install the wordpress. here's the way, just type your domain in addressbar with "/wp-admin". e.g : tuh-bisa-kan.tk/wp-admin

 for the last, just follow the instruction, in this session I'm forget to get the pic.  I'm sorry, but I'm too bored for waiting the file to be uploaded. forgive me my friend

 But I remember the step. first choose your language, there will show blablablabla and klik let's go then you'll asked for name database, username database, password database, and for the table prefix leave it default, click next, then you will asked for site tittle, username dan password to login to your web(it's can be different from database info) and input your email, and voilaa your custom Wordpress ready to go!

 alright, I think that's all step by step for how to Build your own CMS Wordpress , if still any question just write in comment bellow and let me know. if you have an advice spread it in here I would appreciate it. and for the last, please be advise for my abstract word or paragraph, because I'm just newbie here. thanks for coming and good luck. 

 a little secret from me, if your web already done, I'll tell you a secret how to increase your traffic from anywhere you want. so keep stay with me